Basil is one of the most loved herbs in the world—fragrant, flavorful, and incredibly rewarding to grow at home. Whether you enjoy basil in pasta, salads, teas, pesto, or chutneys, having a constant fresh supply right in your balcony or garden is a dream come true. The best part? You don’t need seeds to grow basil. A single healthy stem cutting can multiply into several new basil plants, giving you an endless supply of this aromatic herb.
Growing basil from cuttings is fast, easy, and suitable for beginners and experts alike. In this detailed 1200-word guide, you will learn exactly how to grow basil from cuttings—step by step—along with tips on selecting stems, rooting them in water or soil, caring for the new plants, and keeping your basil bushy and productive.
Let’s dive in!
Why Grow Basil from Cuttings?

Propagating basil from cuttings offers several advantages:
✔ Faster growth than seeds
Cuttings root quickly, usually within 5–10 days, while seeds take longer to germinate and grow.
✔ Guaranteed plant quality
When you take a cutting from a strong, healthy basil plant, the new plant inherits the same vigor and flavor.
✔ Cost-effective
One basil plant can produce dozens of new plants.
✔ Perfect for constant harvesting
More plants = more leaves = more pesto, more chutney, more aromatherapy!
Step 1: Choose the Best Basil Cutting

The success of propagation begins with selecting the right stem.
Characteristics of a Good Cutting:
- 4–6 inches long
- Strong, healthy, and green
- Free from pests or disease
- Not flowering (flowering stems root poorly)
Types of Basil You Can Propagate Easily
You can grow almost any basil variety through cuttings:
- Sweet basil
- Italian basil
- Genovese basil
- Thai basil
- Lemon basil
- Purple basil
- Holy basil (Tulsi)
- Cinnamon basil
All respond beautifully to propagation.
Step 2: Prepare the Cutting

Follow these steps carefully for the best rooting results:
1. Make a Clean Cut
Using clean scissors or pruning shears, cut the stem just below a leaf node. Leaf nodes are areas where leaves grow—and this is where new roots will emerge.
2. Remove the Bottom Leaves
Strip off the leaves from the bottom 2 inches of the stem. Leaves submerged in water will rot and ruin the propagation.
3. Leave Only the Top Leaves
Keep 3–4 leaves at the top. If they are large, trim them by half. This reduces water loss while the cutting forms roots.
Step 3: Rooting the Cutting in Water
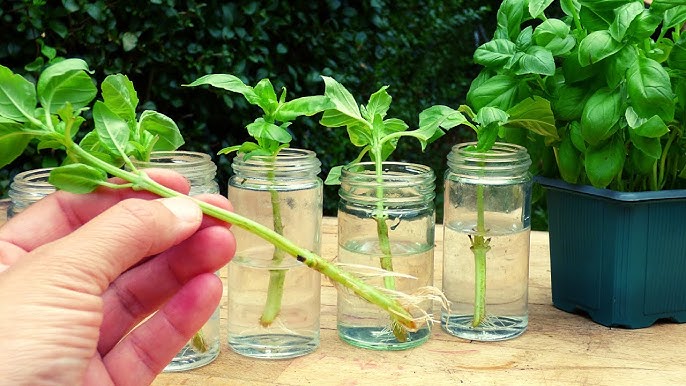
Rooting basil in water is the easiest and most popular method.
How to Root Basil in Water
- Take a clean glass or jar.
- Fill it with room-temperature water.
- Submerge only the leafless part of the stem.
- Place the jar in a bright spot with indirect sunlight.
- Change the water every 2–3 days to keep it fresh.
What Happens Next?
- In 3–5 days, tiny white roots begin to appear.
- In 7–10 days, roots become thick and 1–2 inches long.
- At this stage, the cutting is ready for transplanting.
Important Tips
- Avoid direct harsh sunlight, which can wilt the cutting.
- Ensure leaves never touch the water.
- Do not use chlorinated water; allow tap water to sit for 12 hours before use.
Water propagation is fun because you can see the rooting process happening right before your eyes.
Step 4: Rooting the Cutting in Soil
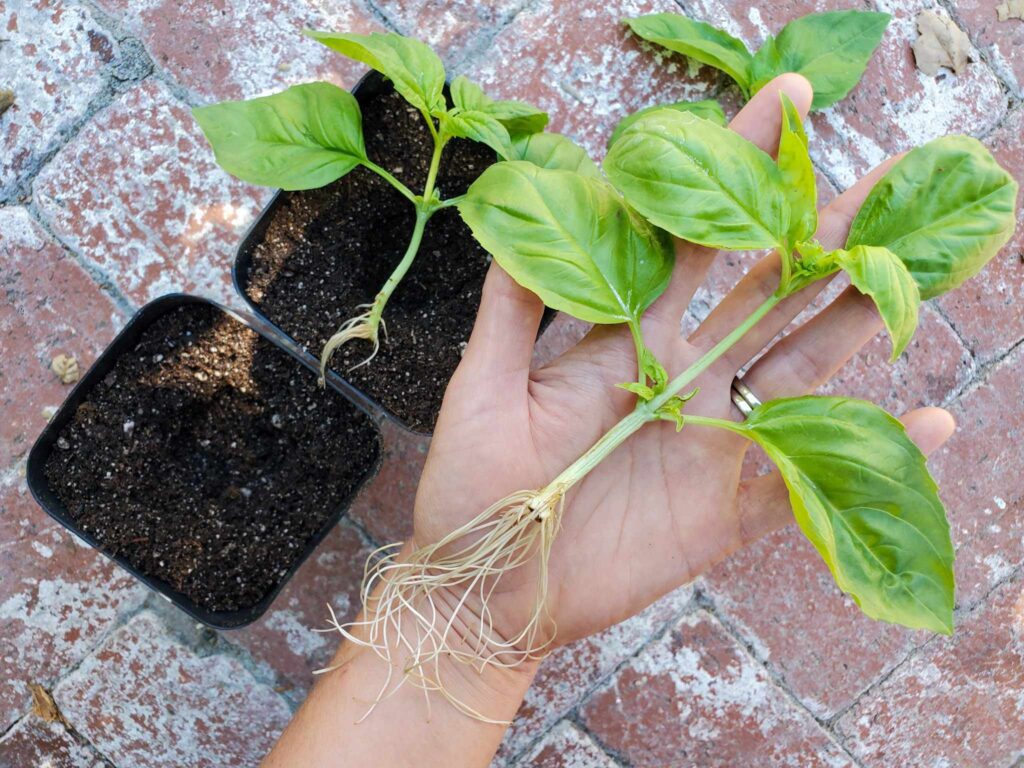
If you prefer, you can root basil cuttings directly in soil as well.
How to Root Directly in Soil
- Prepare a small pot with loose, well-draining soil.
- Make a hole in the soil using your finger or a pencil.
- Insert the prepared cutting gently.
- Press soil lightly around the stem.
- Water thoroughly but gently.
- Place the pot in a bright, shaded area.
Soil Mix for Fast Rooting
- 50% garden soil
- 30% compost
- 20% cocopeat or perlite
Care for Soil-Rooted Cuttings
- Keep soil moist but not soggy.
- Mist the leaves daily for the first week.
- Avoid direct sunlight until strong new growth appears.
Soil propagation takes slightly longer but allows plants to adapt faster to their pot.
Step 5: Transplanting the Rooted Cuttings
Once your cuttings have developed strong roots, you can transplant them.
Best Pot Size for Basil
- 8–10 inch pot for one plant
- 12–14 inch pot for 2–3 basil plants
- Grow bags also work beautifully
How to Transplant
- Fill the pot with nutrient-rich soil.
- Make a small hole in the center.
- Gently place the cutting with its roots inside.
- Cover the roots with soil.
- Water thoroughly.
- Keep the pot in light shade for 2–3 days until the plant settles.
After that, move it to a location with 6 hours of filtered sunlight.
Step 6: Caring for Your Basil Plant
Now that your basil plant is growing happily, it needs proper care to stay bushy and productive.
Watering Requirements
Basil prefers consistently moist soil but hates standing water.
✔ Water when the top inch of soil feels dry.
✔ Avoid wetting the leaves.
✔ Use mulch to retain moisture.
Sunlight Requirements
Basil loves sunlight, but excess heat can stress it.
✔ Provide 4–6 hours of bright, indirect sunlight.
✔ Avoid harsh noon sun in summer.
✔ Grow indoors near a sunny window if necessary.
Fertilizing the Basil Plant
Basil is a moderate feeder. You can fertilize it every 20–25 days.
Best Fertilizer Options
- Compost
- Vermicompost
- Seaweed extract
- Neem cake
- Balanced liquid fertilizer
Avoid high-nitrogen chemical fertilizers—they promote leaf growth but reduce flavor.
Pruning Basil for Bushier Growth
This is the secret to getting a compact, bushy plant!
How to Prune
- When your basil is 6–7 inches tall, cut the top 2 inches.
- Cut just above a leaf node.
- Two new branches emerge from that point.
Repeat this every 10–15 days, and your basil will form a dense, leafy bush instead of growing tall and leggy.
Remove Flowers
Whenever you see flower buds:
- Pinch them off immediately.
Flowering reduces leaf flavor and slows growth.
Harvesting Basil Properly
Start harvesting when the plant is mature enough (around 6–8 inches tall).
How to Harvest
- Cut stems, not individual leaves.
- Always cut just above a node.
- Harvest every week to encourage new growth.
What Not to Do
❌ Do not remove more than one-third of the plant at once.
❌ Do not let it grow too tall without pruning.
Common Problems and How to Fix Them
1. Basil turning yellow
Cause: Overwatering, nutrient deficiency
Fix: Improve drainage, add compost
2. Leaves developing spots
Cause: Fungal issues
Fix: Avoid wet leaves, improve airflow
3. Plant growing leggy
Cause: Lack of sunlight
Fix: Move to a brighter location and prune tops
4. Leaves drooping
Cause: Underwatering
Fix: Water consistently and mulch soil
Growing Basil Indoors vs Outdoors
Indoors
- Easy to control environment
- Great for year-round growth
- Needs good airflow and indirect sunlight
Outdoors
- Faster growth due to natural light
- Bees encourage flowering
- Needs protection from heavy rain and harsh sun
Both environments work well as long as you maintain the right conditions.
Bonus: How to Grow Unlimited Basil from One Cutting
Here’s a simple trick:
- Grow the first cutting into a full plant.
- After 3–4 weeks, take new cuttings from that plant.
- Root those new cuttings in water.
- Repeat the cycle.
Within a few months, you can have dozens of basil plants—perfect for kitchen use, gifting, or growing varieties.
Conclusion
Growing basil from cuttings is one of the simplest and most satisfying gardening techniques you can learn. With a single healthy stem, you can create multiple lush, flavorful basil plants that continue to grow and thrive with minimal care. Whether you root them in water or soil, basil cuttings respond quickly, making propagation fun and rewarding.
By following the steps in this guide—selecting the right cutting, rooting it correctly, transplanting carefully, and pruning regularly—you can create a thriving basil garden that provides fresh leaves for months on end.